May 7, 2017
Showing posts with label Mount St. Helens. Show all posts
Showing posts with label Mount St. Helens. Show all posts
Monday, July 10, 2017
Mt. Rainier Snowshoe - Paradise to Muir Snowfield Via Glacier Vista, Panorama Point, The Sugarloaf
Snowshoeing at Mt. Rainier! The mountain's still got tons of snow as of early May, 2017. The weather was perfect....sunny and warm. There were lots of skiers enjoying spring skiing, too. This is an epic adventure snowshoeing from Paradise to Muir Snowfield via Glacier Vista, Panorama Point, Pebble Creek and the Sugarloaf. Enjoy this amazing winter wonderland in spring and spectacular views of Mt. Rainier and other Cascades peaks including Tatoosh range, Mt. Adams, Mount St. Helens and Mt. Hood and beyond.


Thursday, September 8, 2016
Plummer Peak via Pinnacle Saddle - Mt. Rainier, WA 8-27-2016

Ditch the crowd in Paradise! The hike to Pinnacle Saddle and Plummer
Peak is an easy short hike with moderately steep trail, and views are
FANTASTIC....and less crowded! Perhaps, one of the best and
breathtaking views of Mt. Rainier you can get with less effort.
To get to Plummer Peak, go right/to the west from Pinnacle Saddle. If you go left/to the east, that's climbers route for Pinnacle Peak and the Castle. Soon after you trek down the trail from Pinnacle Saddle towards Plummer Peak, from the main trail there is a sandy trail going uphill to your right. Take that sandy trail to hike up the slope which leads you to the route to Plummer along the saddle. You can actually see it along the saddle if you look up toward Plummer when you approach Pinnacle Saddle.
The trail runs along the saddle and sits on a steep gully, but it is in good shape and solid. So, just traverse carefully. Mt. Rainier to your right and Pinnacle Peak behind you....wow, what a view! The trail gets a little rocky part of the way, but fairly easy hike. In a little over 1/2 mile(?) from the saddle, you reach the top of Plummer Peak. Easy scrambling is needed to get to the summit rock.
Wow, sweeping panoramic views in all directions!....Mt. Rainier, Pinnacle Peak, the Castle, Unicorn Peak, Goat Rocks, Mt. Adams, Mount St. Helens and more peaks and ranges far and near. I could see lots of cars in Paradise....crowded!
If you want amazing views from Tatoosh range, I highly recommend Plummer Peak. Perhaps, you can combine with other hikes for a day hike as it's a easy and short hike. By the way, I noticed colors are changing....summer is almost over! Get out there and enjoy every bit of the summer hiking before it's gone! Cheers!!


Saturday, July 2, 2016
Pinnacle Peak/The Castle - Mt. Rainier, WA

June 30, 2016
Two thumbs up! Amazing hike. In just a little over 1 mile/1000' gain,
this hike offers sweeping vistas of breathtaking mountains, green
valley, lakes, wildlife and the towering peaks of Tatoosh range -
Pinnacle Peak, the Castle, Plummer Peak, Denman Peak, Unicorn
Peak....and more beyond near and far....plus, great workout. You may
say, "really?" And, my answer is YES!!
I always wondered if there was a way to hike up to those peaks sticking out on Tatoosh range seen from Paradise. To me, they always remind me of Gothic cathedrals visually. Last month when I hiked to Unicorn Peak, someone told me there is a short and easy trail to Pinnacle saddle. Since then, I put Pinnacle saddle on my hiking list. When I read the recent trip report on the hike describing the route is snow free and in good condition, my spirit said "let's go!"
Pinnacle Saddle
Trailhead is located right by Reflection Lakes across Stevens Canyon Road. Follow the trail sign which says Pinnacle Peak Trail. The trail starts with a gentle grade and soon climbs steadily. Snow along the trail is almost all gone and there are some small patches left here and there. Glacier lilies are abundantly blooming now in lower elevations and will be bursting all over pretty soon. The trail is in excellent condition, but partially a little wet, which is normal this time of the season as snow is still melting. There is a couple of long stretches of snow still standing en route in about between 0.5 - 1 mile from trailhead. But, they are not hard to cross as the snow is firm and not slippery, and boot tracks are solid. There are a few gullies to traverse en route, and they have some snow, but no problem to cross. One of the gullies has snow and scree (loose rocks) on the path and it was a little tricky as the scree created loose traction. So, pay attention as you proceed.
In 1.3 miles, you reach Pinnacle saddle....the portal to many amazing views and hikes! The trail sign says "End of maintained trail." Wow, where is the amazing views?" Mt. Rainier? Pinnacle Peak? Unfortunately, clouds were forming when I started the hike and by the time when I reached the saddle, it was totally shrouded in the clouds! Darn it....no views?...you've gotta be kidding!? I stepped over to the other side (south) of the saddle.... Mt. Adams was faintly visible through the clouds. But, wait....I could slightly see some blue skies to the east through the clouds!
Pinnacle Peak/the Castle
You have a couple of options for hiking from the saddle. Climbers routes run from the saddle....going right (west) for Plummer Peak and going left (east) for Pinnacle Peak and the Castle. Because I saw some blue skies to the east, I decided to take the trail to east and hike toward Pinnacle Peak/the Castle.
Bingo! The view gradually opened up in blue skies as I came out of the shroud of the clouds. Wow, amazing vistas before my eyes!....the Castle, Mt. Adams, Denman Peak, Plummer Peak, green meadow and valley (Butter Creek Research Natural Area) down below, wildflowers....and Pinnacle Peak looms right beside! In fact, the clouds shrouding part of the valley and surrounding peaks created a mystic beauty of austerity....adversity became advantage.
The climbers route to Pinnacle Peak/the Castle is not too bad. It's dirt, scree and rocks with a little up and down and over all in good shape. There are a couple of sketchy sections en route, but not hard to figure out the way. In about 1/3 mile from the saddle, you come to the point where you may need to decide....either ascend the scree slope to the ridge between Pinnacle and the Castle, or continue the trek toward the Castle, or turn around. It looks there are several different routes and options to choose from there, based on what you aim for with Pinnacle Peak and the Castle. Assessing my capability (I am NOT a rock climber or a hard core scrambler!) and visually evaluating visible traces of routes and other factors (grade, scree, rocks), I decided to climb straight up to a short ridge close to the west face of Pinnacle Peak, instead of hiking further toward the Castle. I was hoping for open vistas to north from the ridge. Ascending the steep route to the ridge was a little tricky due to loose scree, but manageable. A little scrambling near the ridge may be needed....I used my hands to grab the rocks. Overall, the route I took was secure and no serious climbing skills were necessary.
Take in the majestic view of Mt. Rainier! It's the best view of Rainier I've seen among all my Rainer hikes so far. The sea of clouds added a magical beauty no doubt. It gave me goose bumps all over. No joke! Pinnacle Peak looms right beside me and the Castle rises just to west from me. We juxtaposed all together there. Totally amazing. Beyond words. The view south was equally spectacular....Mt. Adams, Unicorn Peak, Denman Peak, Plummer Peak....and Mount St. Helens joined the skyline, too.
If you want amazing views for a short hike, I highly recommend the hike to Pinnacle saddle on a clear day. You can also explore part of climbers routes for additional adventures, either with Plummer Peak or Pinnacle Peak/the Castle. If you are a climber, you already know what you are looking for! I'd like to go back again to hike up to Plummer Peak next time.


Friday, June 24, 2016
Windy Ridge Trail, Truman Trail-Pumice Plains, Loowit Trail & Plains of Abraham Loop - Mount St. Helens, WA

Wow, wow, wow! Actually, I wowed a lot more in this hike. Amazing hike
with stunning views of Mount St. Helens and Spirit Lake ...and bursting
wildflowers. Mount St. Helens is visible even closer/bigger than seen
from the observatory/Boundary Trail as this hike lets you experience
trekking on Pumice Plain in the blast zone. Spirit lake is so blue with
eerie remnants of the past with dead trees still floating. Mt. Adams
looms big and beautiful just to east. Mt. Rainier, Mt. Hood and others
peaks in the vicinity are also seen in this hike. This is very different
from typical evergreen Cascade hikes; and yet, it offers its own unique
beauty, geological terrain and dramatic history of mother nature since
the 1980 eruption.
Ditch the crowd in the observatory! It seems the Johnston observatory and Boundary Trail are often crowded with visitors whereas Windy Ridge is much less so....and views en route from FR 99 are gorgeous. There are also quite a few off-shoot trails and vista points along FR 99. FR 99 (paved) is generally in good shape, but winding and bumpy at times, so pay attention.
Windy Ridge overlook....as the name speaks for itself, Windy Ridge was a little breezy, but not too bad. in fact, thanks to the breeze, the temperature was comfortable and no bug! I started my hike trekking up to Windy Ridge viewpoint upon the hill just behind the restroom. Take in the breathtaking pano view of Spirit Lake and Mount St. Helens. Mt. Rainier and Mt. Hood are also seen in clear skies. And, look east for Mt. Adams.
Windy Ridge Trail....the trailhead is located at the closed gate on the other side across the parking lot from the restroom. Windy Ridge Trail is a well-maintained wide dirt road which leads you to a trail junction for Abraham Trail and Windy Trail/Truman Trail in 1.75 miles. After a mile or so from the trailhead, the view opens up and Mt. Adams and Mount St. Helens come into sight....and wildflowers are blooming all over!
At the trail junction, you have a few options for hiking in Pumice Plain....follow Abraham Trail to hike up toward Plains of Abraham and loop around Windy Pass to Loowit Trail (or continue to Loowit Falls), or take Windy Trail/Loowit Trail to loop around Windy Pass via Abraham Trail counter-clockwise, or hike all the way to Loowit Falls via Windy Trail/Loowit Trail, or trek Truman Trail back and forth in Pumice Plain.
I deiced to explore Truman Trail first, and then Windy Trail/Loowit Trail, and in the end try Abraham Trail on the way back to Windy Ridge instead of doing Plains of Abraham - Windy Pass loop. Last month I hiked Boundary Trail from the observatory to Truman Trail, and this time I wanted to explore the east side of Truman Trail. Truman Trail traverses on the north side of Pumice Plain and eventually connects to Boundary Trail which leads to the observatory. I hiked about a 3/4 mile in and out on Truman Trail to see the north face of the lava dome. It is interesting to see sandy ash and pumice rocks/boulders along the trail. You can notice how nature and landscape have been reviving since the catastrophic eruption 36 years ago. Wildflowers are not abundant on the east side of Truman Trail, however.
Loowit Trail....back to the junction after Truman Trail, following Windy Trail to Loowit Trail was a little tricky at the beginning because the trail is partially washed out. Proceed to westerly from the trail sign, but not to south, to find the trail. Soon after crossing the dry creek, the trail appears obvious and easy to follow Windy Trail to Loowit Trail. The trail goes up and down on Pumice Plain. There is a narrow stream crossing and in 3/4 mile you come to Loowit Trail. I trekked another 1/4 mile or so toward Loowit Falls before I turned around. Enjoy Pumice Plain trekking up and down with wildflowers decorating along the trail and the view of the lave dome. (it's huge!) Spirit Lake is also seen down below to south and spectacular. Mt. Adams also greets in the eastern skyline behind Abraham Trail ridge line.
Back to the trail junction again from Loowit Trail, I took a short journey up to Abraham Trail to explore part of Plains of Abraham loop trail. The trail runs along a long ridge (south end of Windy Ridge) and climbs steep at first, but no worries....it's short. There are log steps connected by wire rope installed on the steep grade. I also noticed traces of bike track along Abraham Trail which indicated the trail is shared with mountain bike riders. Then, I realized the log steps with wire rope are designed for both hikers and mountain bikes. I didn't see any bike riders, however. (Perhaps, it was not weekend?) The vistas from all along the ridge are stunning left and right....Mount St. Helens/Pumice Plain, Mt. Adams, Mt. Hood and the valley down below to east, plus bursting wildflowers. I didn't hike all the way down to Windy Pass as I ran out of time, but the hike along the ridge was great enough for the fantastic views and good workout!
This was my first time to hike the northeast side of Mount St. Helens and now it has become one of my favorite hikes. Although it's a long drive from Seattle (well over 3 hrs!), this hike is certainly worth the trip for what you experience. Go soon for wildflowers as they are in full swing now. Make sure to bring sunscreen, sunglasses, hat and enough water for this hike as it could get pretty hot and dry under sunny skies in summer!


Monday, June 6, 2016
Unicorn Peak via Bench and Snow Lake Trails - Mt. Rainier, WA

This is an epic hike "if" it's done timely....before the snow melts away and the route to Unicorn Peak becomes rocky.
I snow-hiked Bench and Snow Lakes Trails 3 weeks ago and noticed a pointy peak looming by Snow Lake. It intrigued me and learned the peak was Unicorn Peak. Seeing boot tracks heading up to the gully toward the mountain peak, I figured that must be the way to Unicorn Peak.
Reading the recent trip report and WTA's description, I decided to try Unicorn Peak and set the goal to reach the saddle below the summit block. I am an avid hiker, but not a rock climber or into a hard-core scrambling, so reaching the saddle and get a closer view of the peak would be a great adventure, I thought. And, the mission accomplished! What an exciting journey it was! I am glad I did this hike while the route is still snow covered (instead of rocky) and the weather was gorgeous with no bugs this weekend.
The trail to Bench and Snow Lakes is mostly snow free...just patchy snow here and there. The trail has some muddy spots, but no biggie. Glacier lilies are popping out now and will be blooming more soon.
There is one blow down blocking the trail, but it's easy to get around. There is a creek you have to cross, which seemed posing a little issue. I saw some hikers needing a help to cross the creek. There were three options I found for crossing the creek yesterday....hopping on rocks (staying on trail), big fallen tree (veer to left from trail) or small wood piece (veer to right from trail). You can follow the boot tracks based on which way you want to choose for the creek crossing. I followed the boot tracks going right from the main path and found the small wood setting over the creek. The creek seemed relatively shallow there and not too wide (about 4 feet). See the pics for comparison.
After the creek crossing, the trail becomes mostly snow covered and leads you to Snow Lake. The lake is not completely snow/ice free yet, but it is showing up more compared to 3 weeks ago (it was still mostly frozen).
From the lake, I continued the journey to ascend the gully by following the boot tracks. I passed by quite a few climbers coming down en route. The gully is very steep. I could manage ascending the first half without traction device, but as it got steeper and the snow was slushy and slippery, I decided to use microspikes for ascending the second half. Hiking poles are a must. Ice axe may be even better in case of losing traction and slipping down the gully.
The view of the snowfield at the top of the gully is spectacular. It's surrounded by the mountain wall....it made me feel like hiking into a snow-filled gigantic stadium. As you continue to ascend, turn around once in a while and enjoy the view of Mt. Rainer behind you. Traversing the snow field, Unicorn Peak comes into sight with another pointy peak (West Unicorn Peak). My destination was to reach the saddle between the two peaks. The slope to the saddle is once again very steep....and it was slushy/slippery in the late afternoon. I even wished for crampons!
Take in the grand view at the saddle! Worth the effort!! With Unicorn Peak next to you, Mt. Rainier to north and Mt. Adams, Mount St. Helens, Mt. Hood and other peaks of Tatoosh range to south are seen. I hiked down to the south side of the saddle to get a better view of the southern peaks. From the saddle, the climbing routes to the Unicorn's summit block are - scramble the steep north west face, or ascend the snow covered steep route along the south side of the peak, or traverse below the saddle to the east side for scrambling. You should be better equipped with ice axe, crampons and helmet to reach the summit block safely.
Descending from the saddle was a little tricky due to the steep grade and slushy/slippery snow condition which presented a poor traction. So, I ended up glissading down part of the way which saved also my knees! Trekking down the gully was fair as the snow was not so slushy/slippery and I could use the boot tracks as a step.
Unicorn Peak was a great hike and adventure with fantastic views, though it was a bit strenuous to conquer the two rather steep slopes. Instead of scrambling up the rocky trail/gully after the snow is gone, I am glad that I did this hike with the trail still snow covered. The journey to Unicorn Peak gave me such an exciting hike similar to Camp Muir, but only in a shorter distance! (5 miles RT) Two thumbs up!


Monday, May 30, 2016
Boundary Trail - Mount St. Helens, WA

I decided to return to Mount St. Helens again since last week's Boundary trail (west) hike via Hummocks Trail which I really enjoyed. This time I wanted to hike the east side of Boundary Trail from Johnston Ridge Observatory. Also, this week happened to be the 36th anniversary since May 18, 1980 eruption.
After spending a short time visiting Johnston Ridge Observatory, I started out my hike from the trailhead right by the observatory building. The trail is paved part of the way to the vista point upon the hill and eventually splits into two directions....one (paved) loops down to the main parking lot and the other (dirt) continues along the ridge towards Boundary Trail (east) which interconnects to Truman Trail.
As you hike along the route, enjoy the breathtaking views of Mount St. Helens on one side and the rocky peaks and mountain valley on the other. The views are quite dramatic and show such a contrast....moon like terrains devastated by the eruption vs. rocky mountain peaks with deep green forest. Wildflowers are just beginning to bloom in colors of spring adding to the scenery.
There was a sign which said "Boundary Trail is closed at 1.5 miles/Devil's Elbow due to slides", but the slides area is restored and safe to pass Devil's Elbow although it is very exposed and sheer drop, so use caution when you traverse Devil's Elbow.
Take in the stunning views at the vista point of Devil's Elbow....Mount St. Helens directly facing to north, Pumice plain, Spirit Lake and Mt. Adams. From this point on, the trail slightly descends and soon meets with Truman Trail. There the options are either to continue Boundary trail towards Mount Margaret/St. Helens Lake or take Truman Trail towards Mount St. Helens pumice plain/Loowit Falls. I ended my journey right before Truman Trail and turned around. The trekking distance was about 2.5 miles one way from the observatory.
This is a great hike with fantastic views without much elevation gain. With wildflowers fully blooming soon (hopefully), the hike will be totally exquisite!


Wednesday, May 11, 2016
Hummocks Trail and Boundary West Trail - Mount St. Helens, WA

May 9, 2016
Hike of the week recommended by WTA. I decided to head out to hike Hummocks trail combined with Boundary West. The weather was perfect...sunny and not too warm as there was a light breeze.
This is a wonderful hike for all ages, particularly Hummocks Trail. It offers fantastic views of Mount St. Helens with educational and interesting information about the geology and history of Mount St. Helens since the volcanic eruption in 1980. It is amazing you can actually hike along the area where the landscape and ecology were devastated by the eruption and it's been reforming by nature's own will and cycle ever since. I learned so much of the area's landscape geology through the hike.
From the trailhead, I followed Hummocks Trail and at the trail junction I continued on to Boundary Trail heading east. The trail is in good shape and easy to trek with gentle ups and downs. After about a mile in, it begins to climb steeply in switchbacks....be ready to get your heart rate going!
As you keep gaining elevations, the views of the valley down below and Mount St. Helens get better and better. Seeing a remnant of the past all along the trail, you could only imagine the catastrophic force of the eruption which wiped out the area 36 years ago.
I stopped the hike before reaching Loowit Viewpoint because I was running out of time after 7pm. So, I enjoyed the spectacular views of Mount St. Helens and the valley down below on the way and turned around to head back to the trailhead. I returned to my car a little after 8pm. Interestingly, I saw a cougar crossing the highway soon after I drove out of the trailhead parking lot. It looked like a little over 2 ft long and had a dark brown fur.
Wildflowers are just starting to bloom....paintbrush, lupine, phlox, foxglove and so on. They will get into full swing very soon if weather cooperates. The road to Johnston Ridge Observatory is still closed at Coldwater Lake, but it is scheduled to open this weekend/May 14. I would like to go back to hike and explore again....perhaps, hike around the observatory and Spirit Lake area next time.


Wednesday, December 26, 2012
Mount St. Helens, WA
Mount St. Helens, WA – 8,365’
3-18-2010
Worm Flows
Route
Elevation
Gain: 5,700’
Distance:
11 miles RT
*Click to view large.
*Click to view large.

View of
the snow capped active crater from the summit rim. Mt. Margaret, Spirit Lake and Mt. Rainier are also in
frame.
It was a
great snowshoeing adventure to summit Mount St. Helens since my last visit to
Johnston Ridge Observatory during the significant volcanic activities between
2005 and 2006. Mount St. Helens is an
active stratovolcano and was named after the British
diplomat Lord St. Helens who was a friend of explorer George Vancouver who made
a survey of the area in the late 18th century. The volcano is well known for its eruption on May 18, 1980, which caused a massive destruction in the area
and resulted in reducing the elevation of the mountain's summit from 9,677’ to
8,365’ creating a 1 mile wide crater. I
was intrigued with the idea of climbing Mount St. Helens in winter because of
no daily climbing quotas and less crowded compared to the busy hiking season in
spring and summer. In addition, during
April and October climbers traveling above 4,800’ must purchase climbing
permits, but during November and March permits are free of charge. Another
intriguing point of winter summit is to be able to see the snow covered active crater
from the top. Mount St. Helens is a strenuous hike. It has more elevation gain
(5,600’) than Mt. Rainier’s Camp Muir (4,600’) with similar RT distance (10 -11
miles) although Mount St. Helens (8,365’) is not as high as Camp Muir
(10,000’). It took me about 5 hrs to summit in snowshoes, and 3 hrs to descend.
Because the snow on the route was deep and heavy (sticky), I had to alternate snowshoes
and crampons depending on the route’s snow condition. The weather was perfect -
sunny and warm, no wind, which created unexpected enemy – sweating. I almost
ran out of water! Make sure to carry
enough water and stay hydrated with this hike. Views along this hike are stunning,
particularly above timberline. Enjoy the Cascade mountain peaks (Ring of Fire)
- Mt. Rainier, Mt. Adams, Mt. Hood, Mt. Jefferson and Mount St. Helen itself. Mount St. Helens winter climb is quite
challenging, but it is worth all the effort - stunning vistas of the Cascades and the active
volcano, and experience the beauty of “winter wonderland”. It is important to be aware of current avalanche and weather conditions in effect. Don’t get too close to the edge of the crater rim - STAY OFF the
cornices. Start early and have an awesome climb!
Worm
Flows Route:
Worm Flows Climbing Route is the primary route during
winter and early spring. Climbers should be prepared for winter climbing
conditions. Climbers can access Worm Flows route via the Marble
Mountain Sno- Park and the Swift Ski Trail # 244. Worm Flows Climbing Route is
the most direct route to the summit of Mount St. Helens during the winter
season. Ice axe, crampons, and avalanche awareness are recommended on this
route. Skis with climbing skins or snow shoes with cleats are also highly
recommended. From the Marble Mountain Sno-Park take the Swift Ski Trail #244 to
reach timberline. Cross to the west side of Swift Creek, just above Chocolate
Falls (elev. 3,700'). Follow ridges and open slopes to the crater rim. Wooden
route marking posts guide climbers from timberline to approximately 4,800'
elevation. Round trip is approximately 11 miles and RT time is
approximately 7 to 10 hours. To reduce your exposure to avalanche potential,
stay away from snow loaded slopes and gully bottoms. Stay off the cornices at
the crater rim.
 Climbing
permits:
Climbing
permits:
A Climbing
Permit is required for each person, for each day, year round traveling
above 4800 ft elevation on the slopes of Mount St. Helens. November 1 thru
March 31 permits are self issue and free of charge. Climbers can get their permits at the Climbing Register located
at the Lone Fir Resort in Cougar, WA or at Marble Mountain Sno-Park. April 1st
thru October 31 permits are by advance reservations only through the Mount St. Helens Institute.

How to get
there (Worm Flows Climbing Route):
It is a long way to get to the trailhead from
Seattle (4 hrs each way). Start early. Take I-5 south and Exit 22 for
WA-503 east, also known as Lewis River Road. Continue on WA-503 to Couger where you need to stop at the Climbing Register at the Lone Fir Resort for a climbing permit and register your climb. Continue WA-503 and take a left onto Forest
Road 81 toward the Ape Caves. Veer right on Forest Road 83 toward Marble
Mountain Sno-Park. Trailhead is located in the parking lot at 2,700’.


Public shelter at Marble Mountain Sno-Park parking lot at 2,700'.
Other useful climbing info:
Avalanche/weather
report: Northwest Weather and Avalanche Center.
Guided climbs and permits: Mount St. Helens Institute
Current volcano and climbing conditions: Mount St. Helens National Volcanic Monument
 |
| Chocolate Falls |

 Trail sign at trailhead. Trail is well marked. Follow trail signs and markers (on trees) along timberline. As timberline thins out, reminiscences of monumental lava flows and rock formations become prominent in landscape. Chocolate Falls - a short water fall at Swift Creek. No water in winter. View opens up after timberline and trail begins to gain more grade. Mt. Hood (11,249') is visible in south.
Swift Creek divides the banks….east bank and west bank. Climbers are to take the west bank (green line) along the creek to the lava flows and to the summit, not on the east bank (red line) for safety.

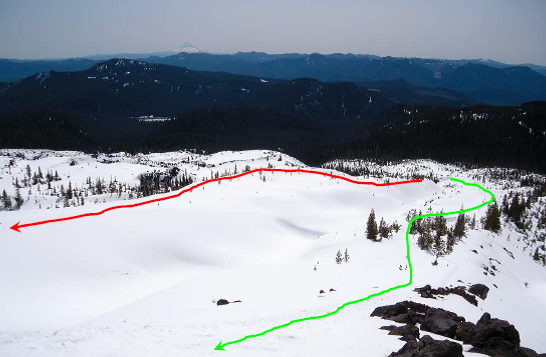


4,800’ marker says “Beyond this point visitors must display a climbing permit.” Without climber registration, hikers are not allowed to climb beyond this point. Above 5,000’ the snow was wet and slushy. I took off my snowshoes and put on crampons. View west of Worm Flows Route around 5,000'.


A small weather station serves as a route marker at 5,600', which marks about a half way distance from the trailhead. 2,800’ to climb to reach the summit from this point. View east is Mt. Adams (12,281').
 Panoramic view at 5,600' - Mt. Adams and Mt. Hood are seen in skyline.
Deceiving summit rim? Looking up toward the summit as you climb, you notice this ridge line which looks like the summit rim. But it is NOT the summit. You still have another 3,000' to climb from here.

View southwest from 6,500’, right above the deceiving ridge. The valley down below is Cougar and Yale Lake. I-5 and Columbia River are vaguely visible in horizon.

 |
| Climbers glissade down near the summit rim. |

View of Mount St. Helens summit rim - breathtaking! Witness the history of the 1980 eruption which took a huge chunk of the mountain top and left this gigantic crater and you realize the magnitude of the living force of mother nature. Steams come out of the active lave dome. Spirit Lake is at the foot of Mt. Margaret and Mt. Rainier (14,411') stands majestic in the north.


At the crater rim. Be careful not to stand too close to the edge of the rim. The true summit of Mount St. Helens – 8,365’. STAY OFF the
cornice!
 |
| Steaming lava dome. |

View of the crater of Mount St. Helens - steaming lava dome as foreground, and Spirit Lake and Mt. Margaret as background.
The last major volcanic activity on May 18, 1980 caused a catastrophic eruption which 57 people; 250 homes, 47 bridges, 15 miles of railways, and 185 miles of highway were destroyed. The eruption triggered a massive debris avalanche reducing the elevation of the mountain's summit from 9,677’ to 8,365’ and created a 1 mile wide horseshoe-shaped crater. The Johnston Ridge Observatory (JRO) is located at the end of the Spirit Lake Memorial Highway (HWY 504). The observatory brings visitors within five miles of the north side of the volcano and offers spectacular views of the still-steaming lava dome, crater, pumice plain and landslide deposit. JRO is located on Johnston Ridge which was named in honor of U.S. Geological Survey (USGS) volcanologist David A. Johnston who was on duty at the USGS, Coldwater II observation post during the May 18, 1980 eruption. David Johnston was one of 57 people who lost their lives in the eruption. He was the first to report the eruption, transmitting the famous message "Vancouver! Vancouver! This is it!" before being swept away by the lateral blast created by the collapse of the mountain's north flank. Ham radio operator Jerry Martin observed the lateral blast overtaking Johnston's camp. Though Johnston's remains have never been found, remnants of his USGS trailer were found by state highway workers in 1993.


Pay attention to follow the route you came from as you descend - Worm Flows Route, or end up going to a wrong direction!
 |
| Trail markers to guide you. |

Remember all climbers must sign-in and sign-out at the Climber's Register (Lone Fir Resort) before and after their climb. I signed out after 9pm.....good reason to start climbing early!

View north of the crater rim. Snow covered lava dome down below.

View of Worm Flows Trail above timberline. Chocolate Falls on the left and Mount St. Helens rises ahead.

View of 1 mile long crater rim at the summit.
Subscribe to:
Posts (Atom)